First things first, I'm the realest.
The start of this blog might look a bit different. That's because I'd like to talk about a variety of different things that link to a variety of different images. All of the parts depicted below will come together to form this:
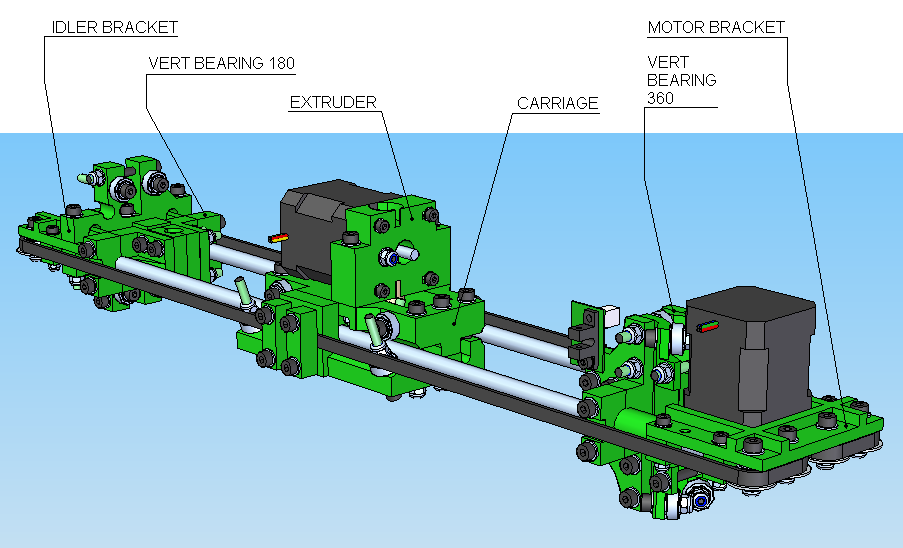 |
| A computer model of the X Axis for the 3D printer |
With that said, let's get started!
 |
| Our progress this week |
The above image is a picture of the fully constructed idler bracket which, as you can see in the computer model, holds the rods in place. The part indicated by the black arrow holds in the smooth rod. This part also allows the x axis of the printer to move up and down on the z axis using the bearings indicated by the red circle. The last important thing to note about this image is the bearing and somewhat larger than normal washer indicated by the green arrow. The large washer is an M4 mudguard washer, and the bearing is a 624 roller bearing. The bearing allows a belt to run freely from one side of the x axis to another, while the mudguard washer stops the belt from slipping off.
 |
| The issue we encountered |
 |
| The improved carriage |
This image is the finished extruder carriage. It is the two parts in the blog from two weeks ago combined. You will notice that there is a golden printed part circled in black. That would be a part for an opto-flag that we printed out. It is held in place by a screw, and when the other part of the x opto-flag is attached to it via the two holes in it, the flag will block a beam of light. I talked about this concept in my last blog.
 |
| The extruder block |
This part is the first printed part for the extruder. In the image, you can see the extruder block and a 604 skateboard bearing. There are, however, two bearings. One of them is visible and the second one is in the same position on the other side. We had to hammer the bearings in due to an extremely tight fit, and we will have to ream out the hole in the center so that we can fit an M4 piece of smooth rod through the center. The extruder in the image at the top of the blog is inaccurate due to the modified version of the extruder we are using, however the extruder still mounts in a similar way. The modified extruder is called Wade's extruder and the plans for it can be found here.
 |
| Both bearings are visible in this image |
As you may be able to tell, we encountered another issue here. The screw, circled in black, interferes with the positioning of the extruder block. From here, we have two decisions. We can order a shorter screw online, or we can relieve the extruder block so that the screw can fit into it. We are currently unsure of how to proceed, although we have some time to decide because we're not looking at building the extruder until we order parts for it.
 |
| All of the assemblies we have put together |
This last image gives you a decent idea of how everything we currently have fits together.
That's it for this week. It's possible that I could have another technology related blog post this week, but at this point I'm unsure. If you have any comments, please leave them in the comments section below.
Thanks again for reading, and have a nice week!
David, you do a great job of explaining your progress. The photos really help your readers (me!) to understand what you're doing. Sometimes writing about things that are clear to you but, complicated for others to understand is really hard, but you've done a really good job being clear and precise.
ReplyDeleteI also continue to be happy with the way you troubleshoot and problem solve. I hope that you will talk about that in your "TedTalk" presentation.